Backup and Restore EKS Kubernetes Using Velero.

Velero is an open-source tool that helps automate the backup and restore of Kubernetes clusters, including any application and its data.
Velero lets you backup your entire cluster or namespace(s) or filter objects by using labels. Velero helps with migrating your on-prem Kubernetes workloads to the cloud, cluster upgrades, and disaster recovery.
Velero enables the following use cases:
- Disaster recovery — backup of the cluster and restore in case of a disaster.
- Application migration — migrate an application along with its data from one cluster to another.
- Application cloning — replicating production environments for testing and debugging.
In this module, you will learn the below things:
1.how to backup and restore an EKS cluster using Velero.
2. how to backup and restore data on 2 different EKS Cluster.
3. how to backup and restore the data at a particular time(Scheduled backup and restore)
Let’s start:
Prerequisites
- AWS CLI needs to be configured in the machine where you execute Velero commands.
- Kubectl needs to be configured with the EKS cluster where you need to take the backup.
1. CREATE S3 BUCKET AND IAM USER FOR VELERO
- Create the S3 bucket using AWS console.
go to AWS -> S3-> create bucket

2. Create an IAM user.
go to AWS -> IAM Console -> add user

3. Add the below permission to the user.
replace ${BUCKET} with S3 bucket name which we created for velero.
{
    "Version": "2012-10-17",
    "Statement": [
        {
            "Effect": "Allow",
            "Action": [
                "ec2:DescribeVolumes",
                "ec2:DescribeSnapshots",
                "ec2:CreateTags",
                "ec2:CreateVolume",
                "ec2:CreateSnapshot",
                "ec2:DeleteSnapshot"
            ],
            "Resource": "*"
        },
        {
            "Effect": "Allow",
            "Action": [
                "s3:GetObject",
                "s3:DeleteObject",
                "s3:PutObject",
                "s3:AbortMultipartUpload",
                "s3:ListMultipartUploadParts"
            ],
            "Resource": [
                "arn:aws:s3:::${VELERO_BUCKET}/*"
            ]
        },
        {
            "Effect": "Allow",
            "Action": [
                "s3:ListBucket"
            ],
            "Resource": [
                "arn:aws:s3:::${VELERO_BUCKET}"
            ]
        }
    ]
}
4. Add user credentials to the server.
using below comment
aws configure
2. INSTALL VELERO Client
Install Velero binary
wget https://github.com/vmware-tanzu/velero/releases/download/v1.3.2/velero-v1.3.2-linux-amd64.tar.gzExtract the tarball:
tar -xvf velero-v1.3.2-linux-amd64.tar.gz -C /tmpMove the extracted velero binary to /usr/local/bin
sudo mv /tmp/velero-v1.3.2-linux-amd64/velero /usr/local/binVerify installation
velero versionoutput:
Client: Version: v1.3.2 Git commit: 55a9914a3e4719fb1578529c45430a8c11c28145 <error getting server version: the server could not find the requested resource (post serverstatusrequests.velero.io)>if you got the velero not found message then set a below path variable for velero.
e.x: export PATH=$PATH:/usr/local/bin
3. Install Velero on EKS
velero install \
    --provider aws \
    --plugins velero/velero-plugin-for-aws:v1.0.1 \
    --bucket <bucketname>\
    --backup-location-config region=<region> \
    --snapshot-location-config region=<region> \
    --secret-file /root/.aws/credentials
replace your bucket name, region, and credentials path in the command.
E.X:
velero install \
    --provider aws \
    --plugins velero/velero-plugin-for-aws:v1.0.1 \
    --bucket velero-backup-harshal \
    --backup-location-config region=us-east-1 \
    --snapshot-location-config region=us-east-1 \
    --secret-file /root/.aws/credentials
Inspect the resources created
kubectl get all -n velero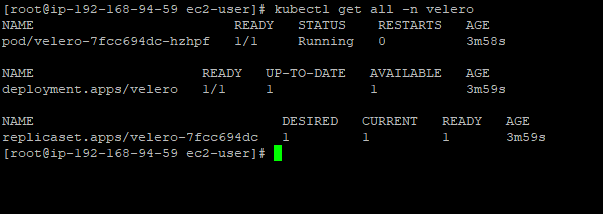
4. DEPLOY TEST APPLICATION
Create namespace and deploy the application
kubectl create namespace <namespacename>kubectl create namespace harshal
Deploy 2 sample applications in the harshal namespace.
kubectl create deployment web --image=gcr.io/google-samples/hello-app:1.0 -n harshalkubectl create deployment nginx --image=nginx -n harshal
Verify deployment
kubectl get deployments -n harshal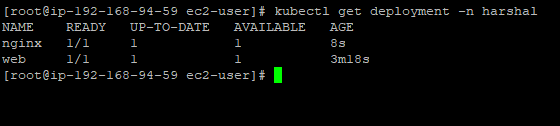
5. BACKUP AND RESTORE
Let’s back up the harshal namespace using velero
backup:
velero backup create <backupname> --include-namespaces <namespacename>velero backup create test1 --include-namespaces harshal
Check the status of backup
velero backup describe <backupname>Check-in S3 bucket :
backup is stored in the S3 bucket.

Let’s delete the ‘harshal’ namespace to simulate a disaster
kubectl delete namespace harshal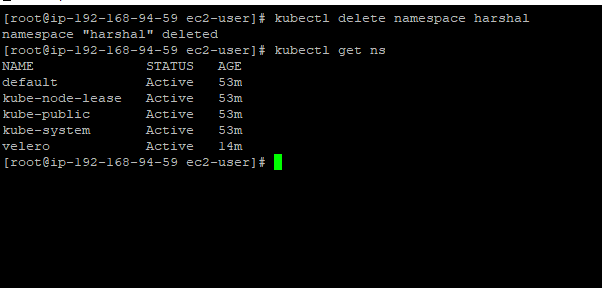
Restore harshal namespace
restore:
Run the velero restore command from the backup created. It may take a couple of minutes to restore the namespace.
velero restore create --from-backup <backupname>velero restore create --from-backup test1
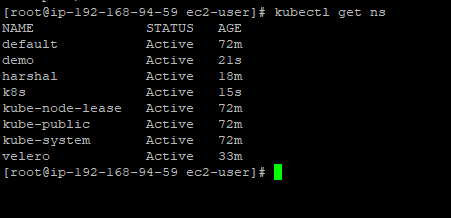
Verify if deployments, replica sets, services, and pods are restored.
In the below image you see, harshal namespace is newly created and restored using velero, and all old deployment, pods, svc also restored back.

Take a backup on ClusterA and restore it to the clusterB.
- Install the velero on both the clusters: clusterA(backup),clusterB(restore)
- Make sure both the cluster points to the same S3 bucket.
E.X:
1.At ClusterA:
we using the below cmd to install velero on eks.
velero install \
    --provider aws \
    --plugins velero/velero-plugin-for-aws:v1.0.1 \
    --bucket <bucketname>\
    --backup-location-config region=<region> \
    --snapshot-location-config region=<region> \
    --secret-file /root/.aws/credentials
2. at ClusterB:
for velero install on eks used the same comment which clusterA used.
here we can use different user credentials also, but the I.M.P thing here is both the cluster point to the same S3 bucket.
velero install \
    --provider aws \
    --plugins velero/velero-plugin-for-aws:v1.0.1 \
    --bucket <bucketname>\
    --backup-location-config region=<region> \
    --snapshot-location-config region=<region> \
    --secret-file /root/.aws/credentials
3. Test
- I created a 2 new namespace(demo,k8s) at cluster A and deployed the same test application on it.

2. Let’s back up the complete ClusterA.
velero backup create <BACKUP_NAME>velero backup create clusterbackup1

3. login to the ClusterB and restore the Cluster A backup on it.
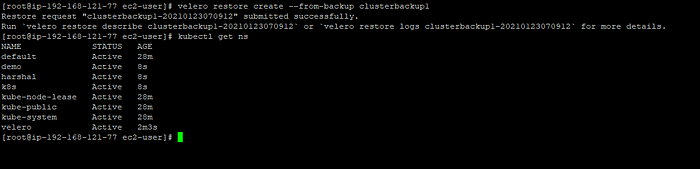
velero restore create --from-backup <backupname>velero restore create --from-backup clusterbackup1
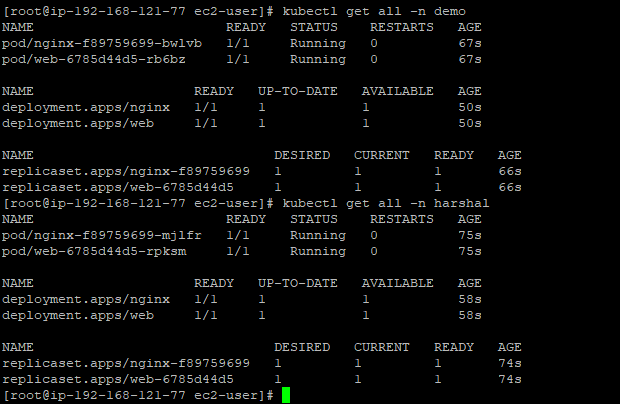
In the below image we see backup is restored successfully and we got all the namespace and deployment, pod, svc on clusterB which are running at ClusterA.
Here are some useful commands for velero :
Backup:
# Create a backup every 6 hours with the @every notation
velero schedule create <SCHEDULE_NAME> --schedule="@every 6h"

# Create a daily backup of the namespace
velero schedule create <SCHEDULE_NAME> --schedule="@every 24h" --include-namespaces <namspacename>

# Create a weekly backup, each living for 90 days (2160 hours)
velero schedule create <SCHEDULE_NAME> --schedule="@every 168h" --ttl 2160h0m0s
##default TTL time is 720h# Create a backup including the test and default namespaces
velero backup create backup --include-namespaces test,default

# Create a backup excluding the kube-system and default namespaces
velero backup create backup --exclude-namespaces kube-system,default# To backup entire cluster
velero backup create <BACKUPNAME>#To backup namespace in a cluster
velero backup create <BACKUPNAME> --include-namespaces <NAMESPACENAME>
Restore:
#Manual Restore
velero restore create --from-backup <backupname>#Scheduled Backup
velero restore create <RESTORE_NAME> --from-schedule <SCHEDULE_NAME># Create a restore including the test and default namespaces
velero restore create --from-backup backup --include-namespaces nginx,default

# Create a restore excluding the kube-system and default namespaces
velero restore create --from-backup backup --exclude-namespaces kube-system,default#Retrieve restore logs
velero restore logs <RESTORE_NAME>
Thank you, if you have any doubt reach out to me
LinkedIn : linkedin.com/in/harshal-kathar-b2a19b118